Follow me here!

Thursday, August 16, 2012

GLITTERLAND!

The lovely Dahlia at Sassy Nails is opening GLITTERLAND tonight at midnight PST!  Are you as excited as I am? Eh, well, you should be because this chunky decorative glitter is the bomb.com. I got these awesome orange stars that have a yellow iridescence to them. Stars? SHOOTING STARS!

Here's what I did with them then I'll tell you how I did it!
First, here's a quick shot of the glitter (don't mind me today, I'm washing my lightbox mat so I had to use a black t-shirt!)  So you see that you get more than just one type of glitter per baggie- you get a cutout and a solid shape. I LOVE that!  Can you see the iridescence?


I layered these glitters over OPI DS Extravagance. This one is my absolute favorite plum-y purple ever. Holy cow I can't stop staring!    Since I got the stars, I could only think SHOOTING STARS! Specifically "The More You Know"....from the PSA's. I waited for the DS to dry, then painted some seche on top, waited a few seconds for it to get partially tacky, took my tweezers and applied the glitter.  After that dried for a moment I took some striping glitters from Finger Paints (unnamed, one was gold holo, the other silver/blue holo) and made my star's tails.  In all, I love how they turned out and I LOVE the glitter! I'm in love with the fact that you get the cutout and the solid shape. She's got tons of shapes and colors to choose from so go check it out! www.datyorkloves.blogspot.com and click on the glitterland link!

This product was provided in exchange for my honest review. All opinions are my own and absolutely honest.

Friday, August 10, 2012

A England Lady Of The Lake

Two posts in one day? I must be feeling feisty, lol.

Actually, I just couldn't wait to show you this gorgeous polish. This post is picture heavy because I couldn't stop taking pictures- nearly a hundred of this one alone! It was hard to settle on just a few.

Lady Of The Lake is an eggplant purple with scattered holo all throughout. To say that I love this polish is an understatement. It's from her Mythical's Collection which includes other beauties, such as Tristam (one I really want) which she matched perfectly to the color of her kittie's eyes. Inspiration comes from everywhere! You can purchase them at her website directly HERE or from her US distribution partner, my FAVORITE place to buy polish: NINJA POLISH!

It went on like butter and listen to this guys; ONE COAT! Granted it was a bit thickish, but I've rarely had a polish go on so perfectly. I'm going to be needing all of her colors ever made. Anyone want to do some swaps? Hahaha. No, seriously, I'll be generous with my swapping for a few A England's.

Dry time on this was surprisingly fast, probably because I only needed one coat. I'm glad too, because that means this one will last a while.

Let's have some pictures, shall we? All of these are in natural light.

First, look at the gorgeous stamp it came with! I'm such a sucker for stamps.


Now, on to the polish! Here's a shot under my ott-lite. You can see the holo in this shot pretty well. Rainbows!


And finally, an appearance by my awesome owl doormat. I've named him Cecil.


Do you own any A England, and do you love it as much as I do? I'd love to put holo top coat on this too! Hahahaha. I'm such a holo whore. How would you like to see this layered?


A floam sandwich!


I'm not quiet about my love of Nailventurous' Floam.  It is everything I love about nail polish. And it's fun! Really fun!

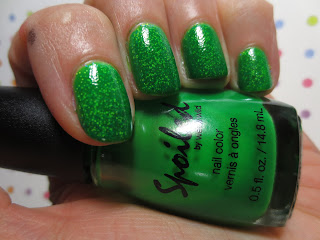
I've had this bright green jelly from Spoiled called Permission To Proceed. It is one of my favorite jellies. I've been dying to try this because I knew they'd be perfect for each other.
And...it IS perfect.

I started with two coats of Permission To Proceed, let that dry fully and then one coat of Floam. This is how it looked. No cleanup (I was excited!)


I let the Floam dry completely because it's really bad about dragging. After it dried completely I topped it with another coat of Permission To Proceed and here's the end result of my Floam Sandwich!


What do you think? Were these two polishes made for each other or what? I really do love this combo.

You can purchase Floam from Ninja Polish HERE.  Floam is a polish that all polish lovers should own.


Sunday, August 5, 2012

NOTD- a glitter gradient!

I really should be named the midnight manicurist. Because of the hubs night schedule at work, I don't get any time to myself until after all three of the kids are in bed. Tonight I wanted to do something really fun and new- so I tried a glitter gradient.

For the base of this gradient I used Perception Nail Lacquer's Wicked.  It's a maroon-ish blackened red with scattered (very, very scattered) holo flecks hidden inside. It had great color coverage in one coat.  For the glitter gradient I used Revlon's Stunning, which is a glitter made up of of large holo hexes and smaller holo round glitter. It is SUCH a fun glitter and I've yet to really use it in a fun way so this was perfect!


Try a glitter mani sometime this week and post your results to my wall, I want to seeeee!

Have a wonderful week ahead and happy polishing!
Carrie :)

Friday, August 3, 2012

China Glaze For Audrey!!!!

We all know I have a problem with turquoise polishes. It's more than a problem....it's full on obsession. Or, as we who grew up in the south would say "Turquaahhhs."

Let's get to the heart of the matter here though. That perfect Tiffany Blue.  I see turquoise, but who's counting (uh....me?).  This is a color that inspires calm. That is, unless, you're the recipient of such a box, in which case, feel free to freak the hell out.
For Audrey by China Glaze is meant to emulate this blue and pay homage to Audrey Hepburn.  They got this REALLY close and it is now my favorite turquoise of all time.(OF ALL TIMMMMEEEEEEE!!)  And you know it's got to be uber spectacular to unseat Zoya's Wednesday as my favorite.

Artificial light


Label, Artificial Light

So, thoughts on this polish.... it was a bit thin for my liking. It slid down into my cuticles a bit. Two coats for full coverage and I didn't let it dry long enough between coats so I got a little bubbling. To solve this I let the mani dry completely, applied one more coat on the bubbled nails and topped with Seche. Can you see any bubbles? Neither can I, and my camera sees waaaay more imperfections than the naked eye ever could. I need to get an older camera with less resolution.(HAH!)

I went to an event with the kids today where there were seriously like 50 inflatable water slides, games, sumo wrestling, jousting, all sorts of water games. This polish held up wonderfully. I expected chips galore. NONE :)


You guys also know by now that I can't leave well enough alone so I made a dotticure with an orange stick. For this I used WetnWild's Tropicalia for the bright coral pink dots and Julep's Daisy (yellow) and Morgan (purple) dots. I love how it turned out!

So, how much are you loving For Audrey right now? What is your absolute favorite color family of polish?...you know, that one that you can't help but buy, even though you've got a million similar.  It makes me think of that "Gee your nails look great" meme of her holding turquoise polishes saying "They're NOT the same, they're SIMILAR!" ....that's totally me to my husband.

Happy polishing,
Carrie :)

Wednesday, August 1, 2012

Hey, thanks!

I have lots to be thankful for. Firstly for you guys, who are uplifting and funny. Secondly, for my family who's really gotten into nail polish on my behalf- I LOVE that! Lastly, for the wonderful people I've met through this (mis)adventure- (Especially the person mentioned in this post. xoxo!). So- here's my thank you to you guys :)

 The TY means Thank You! ;)


On that note, I received a wonderful package from Becky over at Naked Without Polish (www.nakedwithoutpolish.blogspot.com) and facebook HERE.  If you're not following her yet, go do it. She's currently got the best giveaway ever going on- 14 indies! 14!!!
Anyways, she kind of told me what she was sending but I wasn't prepared because in that box was Max Factor Fantasy Fire- That's right- unicorn pee! She also sent me Peacocks Gone Wild, a puzzle-piece notepad (my son has aspergers, so that's so perfect!) and an awesome little nail art stencil set that I'd never seen before. It worked great too! Here's some pictures of the awesome things in the box.


See how stinking cute the notepad is? AND FANTASY FIRE!

I used the nail stencils to make a zebra striped pattern on my pinky. Success! I can't do this freehand.

Peacocks Gone Wild is amazing too, btw. Bottle spam! Here's a macro:


You guys know how hard it is to come by Fantasy Fire, so sharing that with me was just awesome. Help me return the favor by liking her page!

Thanks for stopping by you guys and I'll let you know how fantasy fire turns out. I'm scared to use it because that stuff is liquid gold!  :)

Happy polishing!
Carrie

PS- fantasy fire!


Friday, July 13, 2012

Makeup for pale people- Hahaha!

No, really. I'm pale and wearing too much or the wrong kind of make up makes me look whorish. Just being honest here.  Over time I've found a few ways to be able to wear make up without looking so flooze-tastic. So here ya go! A few people had requested for me to post my makeup routine and I was more than embarassed to do so, but after reading a few of Phyrra's blogs I figured what could it hurt? If you don't know who Phyrra is, go look! http://www.phyrra.net/  I admire how bold she is with her makeup choices. I know that personally, I could never pull that off.

First, here's a picture of my face with no makeup and I'll point out a few problem areas that I try to cover a bit.
You'll probably immediately notice my eczema (bright red dry patches on my face).  I use Lorac ProtecTint in the color "in the buff" to moisturize and provide a little coverage followed by Bare Minerals powder to cover without making me look over-makeup-ed. Is that a word? It is for this purpose. Hahaha.
 
And an after picture: It covers pretty well without looking caked on.

Next, brows.
Mine are somehow thin and all over the place at the same time. I would love to pull off that fierce arch you'll see in the Benefit ads. I can't though. What I CAN do though is tweeze  them within an inch of their life. For this I use Sally Hansen's Raise Some Brows tweezers. I love these things and keep them in my makeup bag for quick fixes.
Another thing I do to make them look a little fuller is to use a good eyebrow powder. I like Body Shop's Brow and Liner Kit. I don't use the liner though, just the brow color. I use the blunt brush and lightly tap it through the natural brow shape to enhance it a bit. It looks more natural than a waxy pencil to me. In this picture my right brow is without any sort of brow powder, left brow is with. See the difference?

Annnnnd blush: I LOVE Body Shop's highlighter and blush combo in petal. For my skin tone it gives me a nice glow without being too bright or dark.  See the bit of shine it gives on the apples of your cheeks? It's perfection.

With flash to show how it reflects light so well.


Lips:  My natural lips are relatively boring. Not a lot of color. To remedy that I have a whole lot of lip glosses hahahaha. 

On the picture below I used Revlon Just Bitten in Crave. I like that it's got a stain and a balm on each end.

 On this picture, it's Maybelinne's Baby Lips in Pink Punch. One of my favorite colors.

On the eyes: For liner, I usually stick with a plum shade that brings out the green in eyes. I don't have a whole lot of green in there so I like purple shades to pull it out. For this, my favorite lately has been a cheapie and a goodie. ELF's Eye Brightening liner in Plum.
And for the eyeshadow I always stick with gold hues. I don't know why. I just do. I think it adds a bit of pop without being too dark.  I either wear Cover Girl's Golden Sunrise or here, I'm wearing L'Oreal High-Intensity Pigment line in Precious. I love how sparkly it is while still being nude (ish).
I have yet to really find a mascara that I really LOVE. They all seem too wet and make my lashes clump together. I don't have a lot of lashes and to make the few that I have clump up, well that's just cruel.  I've been using Benefit's They're Real- I just load up the brush and let it sit out for five minutes to dry out a bit. It still clumps though.


And that's all I do. This literally takes about 10 minutes to do when I'm not taking pictures of it, hahaha.
This is what I end up with:

And now for product shots:

 Oh! To clean up, I LOVE these wipes. They don't leave residue behind.


Finally done! It took blogger nearly 3 hours to upload these pictures and for me to type it all in between uploads.  Tell me your best beauty tips!