Follow me here!

Sunday, May 27, 2012

NOTD- Memorial Day Patriotic Mani :-)

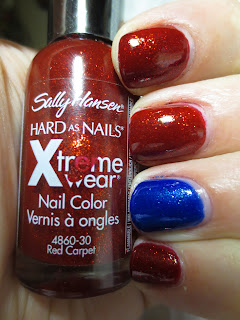
I was once a military wife (I was 18 and he was a young, strapping Army Ranger)....then Iraq happened and he was the first humvee to cross the Iraqui border. I don't talk much about the rest. People change after war, you know?  Anyways, Memorial Day is special day for us. To celebrate, I painted my nails for the occasion and here's how I did it.

I started off with my usual routine: Essie's all-in-one basecoat and I really like Sinful Color's basecoat on top because it really adheres polish to nails. I only use this when I want to keep a mani for several days.  After those two I used Sally Hansen's Xtreme Wear in Red Carpet on all nails except my ring finger and for my accent nail I used Orly's Royal Navy. Sally Hansen's Red Carpet is a nice sparkly red, but not anything that you haven't seen before. Orly's Royal Navy is a nice deep blue with lots of green sparkle inside.  It is my favorite darker blue.


See how pretty this Orly Royal Navy is? I lurve it.

After the base paint, I took my striping brush and China Glaze's Ray-diant to make glittery silver tips.
Finally on my accent nail I painted a big white star!

Since Ray-diant is such a gritty glitter, I used a coat of gelous over the top to smooth everything else and NYC Grand Central Station over top to dry it.


My husband kept saying it looked like Captain America or Wonder Woman nails. He suggested a yellow stripe over the silver one and called me wonderwomanwannabe. Pssssh. I still love these!

What's your Memorial Day mani?  Send them to my FB page and I'll make an album for all of them :-)

Saturday, May 26, 2012

My first tutorial! Cherry Blossoms w/ green tips

.....before I begin, let me just say that I don't do nail art often and I am NOT good at it. This one though is easy and fun.

I've done cherry blossoms on a jade colored background before but it was always just too busy for me so I saw this somewhere and decided to recreate it. This is my first tutorial so bear with me!


Supplies I used:


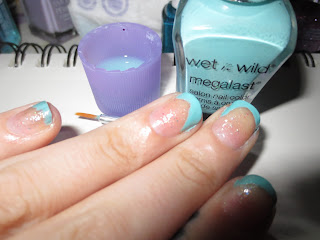
WOW- That came out tiny!  Okay, lesson learned. I spent all that time typing it out on the picture and it's unreadable. Hah! From top left, to right; 100% Acetone, Sinful Colors Black on Black, Wet-n-wild I need a refresh-mint, Wet-n-wild Tropicalia, Spoiled Colors Correction Tape, Sinful Colors Pinky Glitter.  On the bottom I have my combo dotting tool and nail art brush, and then my beloved ELF foundation brush which I use for cleanup. I also use a pad of artists paper. You'll see why. You're going to need a cleanup brush for this one!

First, let me point out a few things. For nail art, I DO NOT use expensive polishes. I think it is wasteful.
Second, my camera died mid-painting so I'll have to describe the last few steps to you as I did them.

*First, I put on a coat of basecoat (I use Essie's all-in-one) then a thin coat of Pinky Glitter. This adds a bit of sparkle but not much else. It's nice. 
*Put a BIG dab of your jade or mint green on the paper and use your art brush to paint the tips. You don't want this perfect and straight. Go up the sides and curve downwards, alternate sides, etc. You'll do two thin coats of this and let it dry 5 minutes or so.


Keep your brush clean and thin your dollop of green polish with acetone if it gets too thick; much like painting with acrylic paints.

Here's where my camera dies...

I then put some black polish on the paper and used a fine striping brush (I saved one from an old bottle of art polish) to add branches. To do this, you don't want straight lines. Make them wiggly! I like to put my branches near the line where you painted the green and then one coming from the top or side. Whatever you want, loves.
 

After you've made your branches, get out your white, pink and red colors and dotting tool. It's not pictured, but I used Essie's muchi muchi for my light pink. Put one large drop of each on the paper, right next to each other and swirl it together like this:

I always add more white than anything. Swirl around the paint a bit with your dotting tool, making sure you get a nice light color and make 4-petal dot flowers on the branches. I don't do more than two per nail. You'll also put single dots along the branches for smaller flowers and you can do 3-dotted flowers as well. Again, however you like it!

When you're done with all of the flowers you'll go back with your pink or red and dot the middle of the flowers.

You've just made Jade and Cherry Blossom nails! These are easy because you don't have to have a steady hand (branches are wiggly!) and you don't have to have really special tools. It's a good starter if you don't do nail art often like me.  If you do this, send your pictures to my facebook page. I'd love to see how wonderful ya'll are!

Until next time,
Carrie

Friday, May 25, 2012

Sally Hansen's Gem Crush in Be-Jeweled.

So toady I've got another Sally Hansen (I'm on a roll with these SH's aren't I?). This one is from their "Gem Crush" line that I've been eyeballing for a while but haven't had the gusto to buy until recently. Very glad that I did because this one is so much fun. Really!
Be-Jeweled is a nice purple micro glitter with larger round pink glitter and a smidge of silver micro glitter in there as well. It's a pretty gritty glitter and she's a hungry glitter. This one ate two coats of seche, a coat of gelous and ANOTHER coat of seche on top of THAT before it was smooth. If you can deal with that, I'd say this is a buy.


Aaaaaand one blurry one to show all of the sparkle she gives.

aaaaaand a macro


and finally, outside shot. Daylight was fading so I took this before I could do any cleanup.


Do you own and of the Gem Crush series? What's your favorite?

Until next time, happy polishing!
Carrie

Thursday, May 24, 2012

An amendment about Sally Hansen's DVD

After I put up the swatches of the Sally Hansen quad last night I was thinking. DVD might be pretty if I just used it over other colors. So I did. WOW. Completely surprised by what I saw.
Below you see it layered over Zoya's Ivanka (I did Charla afterwards and it was even better, but I didn't get pictures of that one. Sad day) and Spoiled Color's Checkin' Into Rehab.

Look how pretty! Okay, I lost my second clean-up brush in a week so there's NO cleanup on these.

So my amendment? Definitely look into getting DVD. I am going to get a full-sized one today!


Wednesday, May 23, 2012

Sally Hansen HD minis


Sally Hansen HD Colors in Lite, Hi Res, Cyber and DVD


I know that these have been out for a while, and I was never really interested in the set until I saw that I could buy the minis as a set for less than the cost of one full bottle. I'm a sucker for variety so I swiped it and left before I could talk myself out of it.

Let's start with Lite.  I really like this color yellow. It is bright and shimmery with a bright finish.  I would ALMOST call it a foil. This is one of the two that I'd really wear again and this is one of the very few yellows that I like.


Next is Hi-Res. It is a bright pink shimmer that leans toward the magenta side. In the bottle it looks like a pink/purple duochrome but sadly, that didn't really translate on the nail. It's still really pretty and it is one of the two that I would wear again even though it doesn't flash as much of the purple in it as I'd hoped. It is still really pretty. I only got one picture to flash a bit of the duochrome.

Third is Cyber, it is a bright grapey purple shimmer. It is a lot more purple than my pictures are showing and I don't know why. I tried natural light, artificial light with the ott-light (which ALWAYS shows things true to color) and ambient lighting.
This one bubbled up almost immediately though....so here's a picture of that.

This bubbling happened with no topcoat and three THIN coats. Bubbling is a pretty rare problem for me and the fact that this bubbled almost immediately does not bode well with me.

Lastly I have DVD. I had a heck of a time finding out what color this is because there were no polish names on ANY of the bottles. How weird is that? This one is a blue/purple glitter duochrome. Very sheer on it's own. I would suggest layering this on top of black I think.  I actually had to paint this on my nail again as I write this to solidify my opinion that it does not promise as much duochrome fun as the bottle would have you believe. Don't get me wrong, it's pretty, but not near as spectacular as you might think it is while looking at it on the shelf.  Below is pictured three coats, with the top one being rather thick.


Overall I'm not super-impressed with DVD and Cyber. I did really like Lite and Hi-Res though. Formula was pretty bad on Cyber and DVD was quite sheer. Lite is gorgeous! I am really thinking about putting that one on again very soon and Hi-Res is lots of fun for a pink. I'm not usually a fan of bright pinks but this one I like.

The brushes on these were poo. They were TINY (even for a mini) and didn't grab enough polish for one stroke across the nail. I had to re-dip so much it really was an issue.

Sunday, May 20, 2012

ink&polish; 50 FOLLOWER GIVEAWAY!

It took a while, but we made it!!! Up for grabs here is a BRAND NEW, NEVER OPENED BOTTLE OF ZOYA ALEGRA! This is one of my favorite polishes and I love to share things I love. I'll also throw in a surprise gift to the winner. I wonder what it is? :-) I love surprises.  I hope that the people who find me through the giveaway stay on as fans- there's big things planned here at ink&polish. Another giveaway at 100 likes!

Alrighty.......so  have at it guys! Share my giveaway photo on facebook for an extra daily entry. Remember, I can't see who shares the photo unless you share my ORIGINAL photo posting on FB.
Open until midnight on Thursday, May 24. Make sure that the email you provide is one that you check daily. If the winner doesn't respond 48 hours after they are notified, I will pick another winner. Sorry, this giveaway is NOT open internationally due to shipping constraints on hazardous substances.


a Rafflecopter giveaway

Revlon's Sheer Seafoam Review and Swatches: and a HUGE letdown

So- before I start this review I'd like to point out a few things. #1; teals, seafoam, turquoise, mint green; those are my favorite colors ever. #2; Jellies are my favorite polish type.  Imagine my surprise and absolute joy when I saw a seafoam jelly! Oh man, I couldn't contain my excitement. I ran home and started swatching, only to be completely let down. First, a bottle shot so you can see the color in the bottle.


Isn't this gorgeous in the bottle? However, when I put a coat of this polish on..... well let me just show you what happened.

It looks like I wore a blue polish that stained my nails and then put clearcoat over it. This one is horrid. Just to see how many coats it might take to reach even semi-opacity I kept putting on layers of polish. Do you want to know how many coats it took? NINE. Nine coats. It never dried. I don't know why on earth Revlon would put this out.

There's no redeeming qualities to this polish. Take a look at the first picture. Do you see how much polish has been used? That's after one use trying to get something semi-opaque.


I'm going to post this on Revlon's wall and pose to them the question: "How did this make it past the research phase?"

This is another polish I'm not even going to bother rating. 


Saturday, May 19, 2012

Essie's Go Overboard Review and Swatches

Go [throw this thing] Overboard
Essie's always been one of my favorite brands. Go Overboard is a dark teal cream. I LOVE this color. It is really pigment saturated which is good but overall I'm disappointed.
Let's start with some swatches and then I'll go over my (long) list of issues I had with this one.


Alright, so first things...formula. This one was really thin. It ran down into my cuticles and when I tried to do a cleanup, it dyed my fingers and fingernails even though I wore a basecoat. Do you see my blue cuticles? Yeah, that did not come off for two days. It was a mess.
THEN the next day as I was going to work I noticed terrible bubbling. I even took a picture to show you how bad it was. This was on every single nail and it was BAD. I didn't put on thick coats, either. It was two thin ones. The formula was so thin there was no way to apply a thick coat even if I wanted to.  On top of all that it stained my nails and cuticles.
Wear- wear on this one was pretty poor too. Not long into my first day of wearing this I had lots of chips. I ended up just peeling it off halfway through the day. I don't like doing that but I don't like having really chipped polish either.
The brush on this one was also really thin. I don't know if I've ever had an Essie brush that was this thin and with all of the wider brushes going around, you'd think Essie would have gotten on board some. It took seven strokes to cover my nail with one coat. I can usually get away with three, possible four.

I'm not even going to rate this one like I normally do.
I'm sad, Essie! I hope this was just a really bad mix-up somewhere at the factory and that ALL of this color weren't this terrible. :( 
I really wanted to love this color.

Until tomorrow,
Carrie

Wednesday, May 16, 2012

Sally Hansen Smooth and Perfect swatches and review

I was looking for something different today on the nail aisle at Target and these polishes have been piquing my interest for a while. Why not. I grabbed "AIR" and ran to work so I could paint them on my poor naked nails.  With a name like "Smooth AND Perfect" you'd better have a home run of a product or you're going to have a big flop. To my surprise, this polish lives up to it's name. First, a few swatches:


First coat of both of these colors went on really sheer. So sheer that if you didn't know I had polish on, you'd never be able to see it. Coat two went on a little darker but by coat three of both of these, it was PERFECT...and....SMOOTH. Go figure, right? By smooth, I mean it even filled the permanent ridge in my pinky nail perfectly without any ridge filler or basecoat. I can't see a deep ridge, can you?
Normally if a polish takes three coats to look opaque then it's too much hastle for me to deal with and I never really use it again. For these, I'll make an exception.  Formula on this has been great so far. Not too thick or thin and you can build up opacity however you'd like. You can get a sheer wash of color or go completely opaque. I Had two smudges while waiting for this to dry and the formula is SO good on these that the smudges worked themselves out into a completely smooth finish and you'd never know I smudged two nails.

All of the colors in this line are soft pastels and all very demure and can be paired with any other polish in this line and look perfect. The line also includes some pinks, corals and a really pretty pastel green (that's the next one I'm going to buy). All of them have a nice subtle shimmer to them, but not too much as to distract from these beautiful colors. Once the color is dried it stays on very well. Removing this polish takes a bit of elbow grease and acetone. I think that's due to the fact that 3 coats + a topcoat is pretty thick.

 Overall I LOVE this line and I'm kind of sad I didn't buy it sooner.  The ONLY thing I didn't like was the three coat application. I'm sure I can live with that though. The purple, Whisper, was so sheer that it took quite a bit of polish from the bottle. Those are my only two complaints. Nothing major.

Swatches pictured above are under artificial light. Accent finger is "AIR" and other four are "WHISPER."

I got these at target but have seen them literally everywhere. If you're into pastels this is a must have in your collection.

RATING SCALE:
Overall- 4.5
Formula: 4/5
Wear- 4.75/5
Personal- 5/5


Thanks and happy polishing!
xo- Carrie

Tuesday, May 15, 2012

I Love Monsta Love!

GlitterDaze Monsta Love...
How do I love thee?
Let me count the ways....

HAH! Cheesy as mess, I know.
Sooo..... I ordered some of GlitterDaze's Monsta Love from the Birthday Girl collection last week. Birthday Girl is named so because it's in celebration of Sana's birthday. Happy Birthday! *confetti*

First, a clippet of text that's on GlitterDaze's website about her polishes:
"Each GlitterDaze nail polish is individually made, just for you!! We try to use the highest quality ingredients and will never include anything that has been tested on animals!"
Great, right? I'm such an animal lover.

Anyways, Monsta Love is a glitter for layering that's loaded with all types of glitter. There's bar glitter, heart shaped glitter, hex, round, micro, square..and colors of magenta, pink, purple and red.
I tried this polish over white originally to showcase all of the great glitters in this one but the base is tinted a bit purplish so it didn't look great in pictures (but in real life, stunner!) and then tried black but that didn't do it justice for pictures either, even though again, in person, it was awesome; so for these swatches I painted Sally Hansen's "Whisper." Finally, the pictures kind of captured the glory of Monsta Love.


See the heart shaped glitter? Heee. It reminds me of when I painted hearts on my ring fingers for my wedding mani.  The bar glitter in this really stands out and adds a nice touch to any color.  Wear on this was fantastic, even on naked nails. Sometimes I have issues with big glitters like this on naked nails. It tends to peel but this one, no peel-age! I was especially rough with my hands today (scrubbing baked cheese off of a casserole dish, unpacking hundreds of shoes, several hand scrubbings...) and I didn't have the first bit of peeling or chipping. I even had a break on my thumbnail and *gasp* had to BITE it off at work to avoid it tearing up the nail bed. Guess what? Not even that caused peeling or chipping. RARE.

Formula on this was outstanding. The base it's in suspended the glitters perfectly. I had absolutely NO settling during shipping and I didn't have to shake it a million times or turn it upside down or fish around in the bottle for a variety of glitters.  Even the greatest polishes have settling (Revlon Whimsical comes to mind) and the fact that this didn't have any was great. You can see in the pictures that there's a good assortment of glitter shapes and colors on each nail. I didn't have to coax that, it brushed on that well. With a nice coat of Gelous on the top I didn't have any whiskers on the bar glitter which I do a lot of the times with shredded and bar glitter. It was as smooth as glass afterwards.

This is a great glitter for layering. I'm going to try it over Essie's Madamoiselle and as a jelly sandwich with Essie's Marshmallow and OPI's Guy Meets Gal-veston. I really can't wait for the Marshmallow jelly sandwich.

The ONLY thing I didn't love about this was the fact that the base has a slightly purple tint that made layering it over white look funky. That's not enough to make a difference for me though. This is still in my top 3 glitters I own. Woo!

This was my first purchase from Sana at GlitterDaze but I know it won't be my last. I will leave you with a picture of the packaging because I'm SUCH a sucker for great packaging and the sticker on this was just so darned cute I had to share. :-)

For all pictures above I painted one coat over naked nails with a thick coat of Gelous on top.


Finally- it's time for my rating!
Overall score- 4.5/5
Formula- 5/5 (the glitter was suspended perfectly in the base. I had NO settling during shipping)
Wear 5/5 (no chips!)
Personal rating 4/5 (tinted base didn't look good over white, but that's minor)

You can find Sana at GlitterDaze in the following places:
Facebook: Clicky
Blogger: Clicky
And she's got a great storefront! Clicky
With the storefront there's no crazed clicking and hoping like there is on Etsy. There's no excuse not to go out and get one ASAP...because, you know....you should ;)

Until next time,
Happy Polishing!
xoxo Carrie


Sunday, May 13, 2012

The $1 Nail Challenge!

While I love and adore all of my indy polishes, I am also a mom of three who has to be price-conscious so I came up with the idea of doing manicures that only use polish I found for less than $1. With all of the great sales the drug stores have been having lately, this was NO problem for me. I saw this dot manicure on someone else's page (I can't remember, so if you know leave a comment so I can give them credit!) and have loved it so I had to try it.
For this one I used Wet n' Wild's Spoiled Colors in Correction tape and Checkin' Into Rehab. Then I used Wet n' Wild Megalast in I Need a Refresh-Mint and Tropicalia.
Finally, I used Sinful Colors in Why Not.

Wet n' Wild and Sinful Colors make some of the greatest colors you'll find in a drug store and make great options to use for nail art like this. Formula is good on all of the Wet n' Wild colors but the Sinful Colors Why Not (blue) stains my nails and cuticles pretty badly. It is a really pigmented blue but not even black stains my nails so much. ALWAYS use a basecoat for this one if you plan on buying it. That being said, it is a great color for the price.
Tropicalia, I Need a Refresh-Mint are made by Wet n' Wild under their Megalast brand. The brushes on these are wonderfully thick and pick up enough polish to avoid re-dipping the brush several times.
Correction Tape. Checkin' Into Rehab are made by Wet n' Wild's Spoiled brand and I love them too. Brush structure is the same as the Megalast so that's probably why.

Now it's YOUR turn to show me what you can do with polishes you find for $1 or less. Post the pictures to my facebook page and I'll share them on Mondays. Sound fun? It is!

Happy polishing,
Carrie
www.facebook.com/inkandpolish

Wet n' Wild can be found here: Clicky
Sinful Colors can be found here: Clicky

Jawbreaker- this one won't hurt your teeth but is just as sweet

Jawbreaker by Pretty&Polished is one of the most talked about and beloved polishes in the blogger community right now and rightfully so. Every time I wear it I get tons of compliments and I hate having to take it off to swatch. Jawbreaker was my first ever indy polish and it's what made me fall in love with indy brands. It's an almost white jelly-ish base packed with glitter (gold, red, green, blue, purple) of all different shapes and sizes (bar, micro, square, hex, round). It's nearly a perfect match to the giant white jawbreaker candies we all loved as children. Have a look for yourself:
(pictured under artificial light)
Don't you agree? Of all of my polishes this is my favorite by far; It's also the most commented on as well. Formula is great. Hardly any settling occurs and you can go sheer or opaque. I have three coats on my index finger and two coats on my other three. It goes on super smooth and you don't even really need a topcoat but I always prefer it. This polish rarely chips and will stay on for days if you wrap your nails (as you always should!).  I love it when I end up with a big blue or red chunk of glitter right on top or just under the surface so you kind of see it through the other layers.
This is my only polish from Pretty&Polished but I know it won't be my last.

You can keep up with her on Facebook, blog and Etsy storefront to find out when her next shop opening will be. These go FAST so have your info ready to go.
Facebook: Clicky
Blog:Clicky
Etsy:Clicky

Overall rating 5/5
Formula- 5/5
Wear- 5/5
Personal rating: 5/5

Dandy Nails' Funhouse: it lives up to it's name.

During Dandy Nails last sale I ordered "Funhouse."    I've been hearing great things about Dandy's polishes so I hurried over and when I saw Funhouse I fell in love. I knew I had to have it.
Fast-forward a week and it's finally in my possession. I've never owned a shredded glitter and this one had high reviews- and let me tell you, it does NOT disappoint. It's got teal and magenta shreds with tiny little silver glitter mixed into a clear base. First, a shot where you can see the gorgeous shreds in the bottle.


The picture was painted with my non-dominant left hand so excuse the messiness on that hand. Do you see how it got the name Funhouse now?  This polish is so versatile since it's in a clear base. For the swatches I painted over black base so you could really see the colors but have since painted it over white, teal, and a pretty purple jelly. White is my favorite for summer, btw. I loved this so much I swatched it last so I could wear it for a few days.
A few more shots (all under artificial light because it was getting dark out)

Seriously though, how can you NOT love this?  Funhouse could add fun to so many colors. For all of the photos above I painted one coat over Sinful Colors Black on Black and a coat of Seche Vite. Next time I'll try Gelous so maybe I won't have the problem of glitter sticking up out of the topcoat. 

Dandy Nails is another indy polish brand that should be at the top of your list.

You can find her website here: Clicky
Etsy shop here: Clicky
and Facebook here: Clicky

Overall rating 4/5
Formula- 4/5 (it was a tad gloopy until I added some thinner but as always, thicker is better to me)
Wear- 3/5 (personal preference- there was some glitter that stuck up out of the topcoat and bugged me)
Personal rating- 5/5- because I LOVE everything else about this polish. Colors, style of shredded glitter, etc)


Rainbow Honey's Hanami :-)

Happy Mother's Day out there! If you're a mom, I hope you're having a great day of relaxation- for all you children out there I hope you give your mom the day of relaxation she deserves ;)

Now, on to the fun stuff!

I ordered Rainbow Honey's "hanami" during her last shop opening and I am SO glad I did. This polish is really something special. It's a pink jelly base packed with pink glitters (fine, hex and iridescent), white glitters (is that shredded? It has the appearance of crushed sea shells- amazing!) and flecks of purple.  First, a closeup: (I got this picture from her facebook page since I'm waiting on my new camera)


Is this gorgeous or what? Let me tell you, it's really a great product when I feel really bad about having to remove a polish to do more swatching.  As soon as I was done swatching a few more polishes I immediately put it back on, and even layered it over a purple jelly on my toes. That turned out fabulous as well, but I won't make you look at pictures of my toes. It's better this way. ;)

I have read a few bloggers who have said they think the packaging is a bit much since they're just going to throw it away but I really appreciate the extra touches she adds to the orders. The boxes are really cute and the bottles are even more awesome. Here's a swatch with the box:
And here's one in daylight:

And one in artificial light:

I can not say how much I LOVE this polish and I am really looking forward to the Equestria collection. If you don't own any Rainbow Honey polishes yet, you should really check them out. Her contact information is here:
Facebook: Clicky
Website: Clicky
Etsy: Clicky

For all of the pictures above I applied three coats over basecoat (I love my glitters extra-thick!) and one coat of Seche Vite. When I re-painted them though I used a coat of Gelous on top and I got a nice, glassy sheen that I was looking for. The formula arrived a bit thick but as she adds in with her instructions, a few drops of thinner made this perfect. I like that she mixes it thick since I like my glitters on the thick side. The glitter didn't need to be fished out or stirred because each dip into the bottle produced a great mix of glitter.

Overall- 5/5
Formula- 4/5
Wear- 5/5 (glitters always wear well)
Personal rating- a big 5/5.


I purchased this polish with my own money for review. I have not been compensated for my opinions and all opinions are my own.